Tuesday, December 17, 2013

Double Dark-Chocolate and Ginger Biscotti

This weekend I was experimenting with different variations, once again, on my pumpkin biscotti recipe. I wanted biscotti that looked innocent, but had a secret BOOM I DID NOT EXPECT THAT BUT REALLY LIKE IT flavor to it. The sweet spiciness of the fresh ginger in these cookies complements the richness of the dark chocolate.
These are great for the winter with a big mug of hot cocoa on a snowy day. They are hands down my new favorite biscotti flavor.

Double Dark-Chocolate and Ginger Biscotti~ The Dreams Weaver
What you will need:
1 cup all-purpose flour
1/3 cup unsweetened cocoa powder
1 ½ tsps. baking powder
¼ tsp. salt
1 large egg, plus 1 egg yolk
½ cup sugar
1 teaspoon vanilla extract
¼ cup canola oil
½ cup dark chocolate chips (or 3 ounces dark chocolate, coarsely chopped)
¼ cup grated fresh ginger (or finely chopped crystallized ginger)
Optional: ½ cup walnuts, coarsely chopped.

Double Dark-Chocolate and Ginger Biscotti~ The Dreams Weaver

Preheat oven to 350˚. Line a baking sheet with parchment paper.

In a large bowl, whisk together flour, cocoa powder, baking powder, and salt until well combined.

Double Dark-Chocolate and Ginger Biscotti~ The Dreams Weaver
In a medium bowl, beat egg, egg yolk, and sugar until light and fluffy; beat in the vanilla and oil until well combined.
Double Dark-Chocolate and Ginger Biscotti~ The Dreams Weaver
Slowly add the egg mixture to the dry mixture, beat the mixture until well combined. Fold in chocolate chips, and ginger with a rubber spatula, at this point the dough will be really stiff.

Double Dark-Chocolate and Ginger Biscotti~ The Dreams Weaver

Double Dark-Chocolate and Ginger Biscotti~ The Dreams Weaver
With moistened hands shape the dough into 2 logs, each about 9” long and 2 ½” wide. Bake until set on top, about 20 minutes.
Double Dark-Chocolate and Ginger Biscotti~ The Dreams Weaver
Let the logs cool 10 minutes on the baking sheet. Reduce oven temperature to 325˚.

Transfer logs to a cutting board and, with a serrated knife, cut each into ½” thick slices . Bake until crisp, about 20 minutes, turning the biscotti over 10 minutes through. 

Double Dark-Chocolate and Ginger Biscotti~ The Dreams Weaver
Let the biscotti cool 5 minutes on a baking sheet, then transfer to a wire rack to cool completely.

Store in an airtight container for up to a week, or turn around for a minute and have your husband eat the whole batch.


Enjoy!


 photo signature_zpsf75b5071.png

Thursday, December 12, 2013

What I Wore Wednesday

It feels really strange to have a post centered around me.  When it comes to my blog posts, I like being behind the camera and letting my DIYing take center stage.  However, my outfit yesterday I am completely in love with!  I was wearing some of my new favorite finds mixed with some oldies.

What I Wore Wednesday~ The Dreams Weaver

…It all started with my designer collection obsession from Target.  I have gotten at least one piece of each limited edition collection Target has released since the first one of Proenza Schouler back in 2007.  You can imagine how much I have spent since then with over a dozen collections launched!
What I Wore Wednesday~ The Dreams Weaver
Proenza Schouler
The last collection that launched was 3.1 Phillip Lim this past September.  His collection had bright graphics, and of course my favorite, ANIMAL PRINT! 

A few other items I scored from past collections:
What I Wore Wednesday~ The Dreams Weaver

What I Wore Wednesday~ The Dreams Weaver


Fast forward to the other week, who can forget Turkey Day?  My body is still recuperating from all that food!  I went back home to New York for Thanksgiving, and did the Moonlight shopping at Tanger Outlets (our new tradition!) and scored this AMAZING cobalt blue bag at Kate Spade, 60% off outlet prices- WIN!  Along with a matching wallet, iPad mini case, and2 bracelets.  And that was all just Kate Spade.
What I Wore Wednesday~ The Dreams Weaver

I really love shopping, can’t you tell?  And I love getting it all on sale, who pays full retail anymore?

So I paired my animal print skirt and Kate Spade bag with a simple turtleneck I have had forever from the GAP and blue flats from UO.  It was a miracle that they were all the same hue of blue!
The finished result:
What I Wore Wednesday~ The Dreams Weaver

Shirt: GAP
Flats: Kimchi Blue for UO (past season)

 photo signature_zpsf75b5071.png

Monday, December 9, 2013

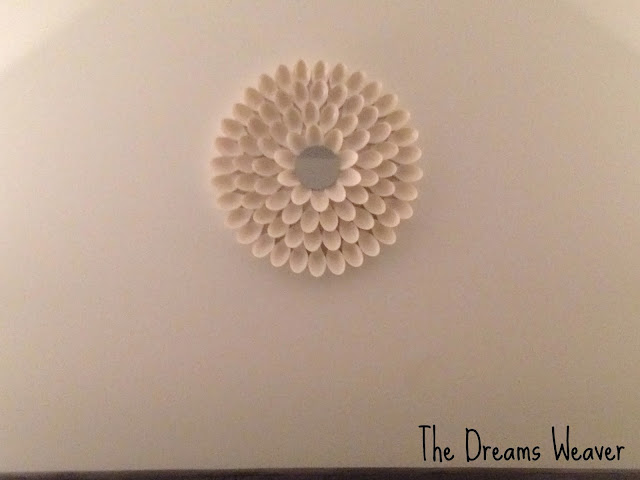
Upcycled Plastic Spoon Sunburst Mirror

 
Our room was in need of some DIYing and a more feminine touch {it’s mostly black and white, modern and clean, but it needed a little me added to it} So I headed over to my Pintrest page to my “For the Home” board of DIY projects I would love to complete, but just end up sitting there forever waiting, and waiting for me to get around to. I landed on this fun, cheap, and easy mirror made from the tops of plastic spoons.
Upcycled Plastic Spoon Sunburst Mirror~ The Dreams Weaver
What you will need:
  • A LOT of plastic spoons
  • Hot glue
  • Round mirror {mine’s 3”}
  • Cardboard
  • Spray paint, any color you want the sunburst to be {I chose Satin White}
  • Hook to hang it {I used a soda tab}
Upcycled Plastic Spoon Sunburst Mirror~ The Dreams Weaver
First, cut the base of the mirror out of a large cardboard box. I used my dog’s water bowl, as it looked like a good size for my mirror.

Upcycled Plastic Spoon Sunburst Mirror~ The Dreams Weaver

Next, you need to break the handles off of all your spoons. I actually needed to put on a pair of gloves, since it felt like I was going to get blisters from the spoon snapping back at me. That really helped! 

Upcycled Plastic Spoon Sunburst Mirror~ The Dreams Weaver
I drew a circle 2” wider in diameter than my mirror in the center of my cardboard. This way I know where I should stop gluing my spoons.

Upcycled Plastic Spoon Sunburst Mirror~ The Dreams Weaver
Now comes the fun part, gluing all the spoons to the cardboard. Start from the outside of the circle and glue around and around, until you reach the center where you traced for your mirror to be placed. When you finish the outer circle and are starting the next layer, stagger the spoon petals so that they are layered between two spoons.

 Upcycled Plastic Spoon Sunburst Mirror~ The Dreams Weaver
For the last layer of spoons, I actually glued the spoons to the back of the mirror.

Upcycled Plastic Spoon Sunburst Mirror~ The Dreams Weaver
I took my sunburst outside to be spray-painted. This step is totally not necessary, but I wanted my sunburst to look less like cheap shiny plastic, and give them a more matte {expensive} finished look. I used a satin finish, off-white spray paint from Krylon, and sprayed two coats of paint.

Upcycled Plastic Spoon Sunburst Mirror~ The Dreams Weaver
I sprayed the mirror with its one layer of spoons separately. I first covered the mirror with a sheet of paper the same size as it, and taped it in place to protect the mirror from the paint.

Upcycled Plastic Spoon Sunburst Mirror~ The Dreams Weaver
Once both pieces were completely dry, I glued the mirror center to the rest of the sunburst.

Upcycled Plastic Spoon Sunburst Mirror~ The Dreams Weaver
Last, I needed to find a small hook that I could glue to the back {since you can’t nail into cardboard!} I was stumped as to what I was going to use for this! Then, as I was drinking a can of seltzer, I decided to use the can’s tab! GENIUS! Voila, we have a hook! Just glue the soda can tab to the backside of the cardboard, leaving the top of the tab hanging off to hang from a nail.

Upcycled Plastic Spoon Sunburst Mirror~ The Dreams Weaver
I am so happy I finally completed one of my Pintrest projects that have been sitting there for forever!  Next stop, back to the Pintrest board.

Upcycled Plastic Spoon Sunburst Mirror~ The Dreams Weaver

Upcycled Plastic Spoon Sunburst Mirror~ The Dreams Weaver


 photo signature_zpsf75b5071.png

Thursday, November 28, 2013

The Dead Game!

Susanne Leist

Check out my Mom's blog for a frightful delight!
The Dead Game, where the dead walk at night.
Check it out HERE


 photo signature_zpsf75b5071.png

Monday, November 25, 2013

Pumpkin Biscotti

It’s almost Thanksgiving, and this weekend I did a bit more pumpkin baking.  I baked pumpkin bread to bring to the Thanksgiving meal, chocolate scones for snacks for the week {I will share my recipe adaptation to my pumpkin scones hopefully later this week} and my new obsession, pumpkin biscotti.

It’s still fall here, but it is undeniable that winter is approaching.  As I was baking, grey clouds crept across the sky, and the chilly wind was howling outside my window scaring the leaves right off the trees.  This is the kind of weather where you just want to stay in, snuggled under a warm blanket with hot cocoa and some freshly baked biscotti. What else?
Pumpkin Biscotti~ The Dreams Weaver
My biscotti are packed with flavor and hints of warm spices, and great for dipping!  

While in the oven, they made the house feel so warming and rustic.

My recipe is very adaptable, swap out the pumpkin puree for chocolate chips, nuts, dried fruit, or any other flavor you are craving.
Baking Tip: When swapping out the pumpkin puree, use less flour as it will be drying without the moist pumpkin puree.  When making my chocolate chip biscotti, I used 2 cups of flour instead of 2 ½ cups.

What you will need:
2 1/2 cups of flour
1 cup of sugar
1 tsp. baking powder
1 tsp. cinnamon
1/2 tsp. nutmeg
Pinch of salt
1 tsp. vanilla extract
2 eggs
1/2 cup of pumpkin purée
Pumpkin Biscotti~ The Dreams Weaver
Preheat oven to 350°F.

In a large bowl add flour, salt, sugar, baking powder, and spices.
Pumpkin Biscotti~ The Dreams Weaver
In a medium bowl, whisk together eggs, pumpkin purée, and vanilla extract.
Pumpkin Biscotti~ The Dreams Weaver
Pour the pumpkin mixture into the flour mixture.  Give it a quick stir to incorporate all of the ingredients, the dough will be a little crumbly.
Pumpkin Biscotti~ The Dreams Weaver
Line a baking sheet with parchment paper.  Form the dough into a long log, roughly 16 inches long by 6 inches wide.  The log should be relatively flat, only about ½ inch high, otherwise you will have really big sliced of biscotti. 
Pumpkin Biscotti~ The Dreams Weaver
Baked for 20-25 minutes at 350°F, until the center is firm to the touch.
You can also make two smaller logs for mini bite-size biscotti, just cut the baking time down to 15-20 minutes.

Let biscotti cool for 15 minutes.  Use a serrated knife cut the log into 1 inch wide pieces. 
Pumpkin Biscotti~ The Dreams Weaver
Turn the oven to 300°F and bake for an additional 15-20 minutes. Allow to cool completely.
Pumpkin Biscotti~ The Dreams Weaver
Biscotti may be still be a little moist and chewy, so if you prefer it crisp let it sit uncovered overnight in a dry space.

Enjoy!
Pumpkin Biscotti~ The Dreams Weaver

 photo signature_zpsf75b5071.png

Wednesday, November 20, 2013

Crockpot Chicken Stoup

What is a stoup you may ask? It is not quite a stew, but thicker than just a regular soup. Thus the T placed oh so nicely in the middle of the soup to represent its thick yummy goodness!  Sure to warm your body as it starts getting colder out!

I came up with my version of a stoup from an adaptation that my mother would make growing up and my father’s cholent {Jewish meat and bean stew, literally everything but the kitchen sink} he would make for holidays.  My stoup is super thick, creamy, and just what the doctor ordered for the cold season.

During the week I tend to be a very lazy cook.  I always try to find ways to make the quickest dinner when I come home from work, while still being able to go to the gym and do whatever else needs to be done.  That is where my stoup comes in.

I prepare my stoup the night before we plan to devour it {ahem, I mean my husband does.} Then the next morning before I leave for work, I just take it out of the fridge, set, and forget.  Then, right when you walk in, BAM you smell it!  I don’t think our dog likes it very much, being stuck with this smell all day and not being able to have some.  But, we add the cow knuckles just for him, and that keeps him occupied for hours!
Crockpot Chicken Stoup~ The Dreams Weaver
The photo really does not do this stoup justice, but I was in a rush to snap one before it was all eaten up!
What you will need:
Chicken- as much or as little as you would like, and any part of the chicken bone/boneless
Beef bones- for a richer flavor, and so our dog gets to take part in this
1 onion
4 potatoes
1 cup baby carrots
2 tomatoes
1 scallion stalk
1 cup barley pre soaked
1 cup kidney beans pre soaked
1 head of broccoli (I use the stem as well)
1 cup mushrooms
4-6 cups good H2O
Crockpot Chicken Stoup~ The Dreams Weaver
Seasonings:
½ tsp. salt
1 tsp. cajon seasoning
3 tsps. garlic powder
3 tsps. paprika
2 tsp. onion powder
½ tsp. ground black pepper
1 tsp. ground tumeric
Crockpot Chicken Stoup~ The Dreams Weaver
The first thing you want to do is to start soaking your beans and barley, each in a glass of water.  Even though everything is going to be cooking all day in water, for some reason if I forget to soak them before they are always crunchy! {not what you want} So this step is crucial to your bean consistency.

Grease the bottom of the crockpot, I swear cleanup is so much easier after.

Dice up your potatoes, add to the crock.
Crockpot Chicken Stoup~ The Dreams Weaver
Next, dice up your scallion, carrots, and tomatoes and dump them on top of the potatoes.
Crockpot Chicken Stoup~ The Dreams Weaver
Next up, the onions and mushrooms!  Onions always make my eyes tear beyond belief, so I started to wear my swimming goggles while dealing with them.  Not the most attractive, but boy do they really work!
Crockpot Chicken Stoup~ The Dreams Weaver
For my broccoli, I use both the head and long stem.  Usually I just toss the huge stem, but that is the bulk of the broccoli when you buy it. So I just went all in and decided to throw it in my stoup.  Once cooked, it sort of has the consistency of a parsnip or a potato and takes on the flavors of the rest of the ingredients.
Crockpot Chicken Stoup~ The Dreams Weaver
Any part of the chicken will do.  If using boneless chicken breast {was on sale that day} dice it up. Another time I made this; whole chickens were on sale, so I just cut the chicken up in eighths. I find that the whole chicken works best for the flavor of the stoup.
I also added 2 cow knuckles {found them totally by accident in the stew section of my grocer’s meat dep’t} which gives my stoup a richer, heartier flavor.  
Crockpot Chicken Stoup~ The Dreams Weaver
Once you have all of your veggies and protein in the crock, add your seasonings, and as much or as little of your sauces you would like.  For my sauces I really didn’t measure them, but I used roughly ¼ cup of each.
Next, add your soaked beans and barley to the mix.
If you are going to start cooking your stoup now, add your 4-6 cups of good H2O. {enough to fill your crock just about to the top}
Or, if you are preparing this the night before like I did, just cover with your crock lid and leave in the fridge overnight.  This also allows all of the spices and sauces to merry together with all the veggies and chicken.
Then, in the morning add your water and set to low and forget.
Crockpot Chicken Stoup~ The Dreams Weaver
12 hours later it looks like this.  You can cook for less time on a higher setting, but I am gone for 12 hours, so I just set it on low for that time.
Crockpot Chicken Stoup~ The Dreams Weaver
This one crock lasted us all week! 
If you don’t want to use it all at once, wait for it to cool and transfer to freezer-safe containers or Ziploc bags.

Another way to serve this stoup, boil up some of your favorite noodles, drain.
Add some of your stoup to your drained noodle pot, and reheat. If you want more of a chicken noodle soup consistency, add some more water while it is heating up. Voila! Chicken noodle soup!

Enjoy!

 photo signature_zpsf75b5071.png