Friday, May 22, 2020

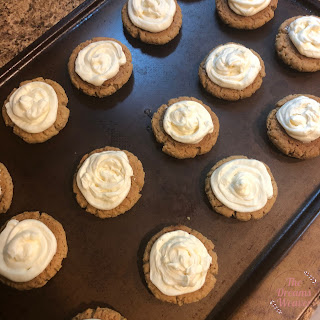
Oatmeal Cream Whoopie Pies

These cookies are so addicting, and even better you get to eat two cookies at once!
Oatmeal Cream Whoopie Pies ~ The Dreams Weaver
What you will need:
Whoopie Cookies
1 1/2 cups butter or neutral oil
1 cup dark brown sugar
1/2 cup granulated sugar
1 large egg
2 tsp vanilla extract
1 tsp dark molasses
1 1/2 cups all purpose flour
1 tsp baking soda
1/2 tsp salt
1/4 tsp ground cinnamon
3 cup instant oats

Filling
3/4 cup butter
1 tsp vanilla extract
2 1/2 cups powdered sugar
1 tbsp milk
Oatmeal Cream Whoopie Pies ~ The Dreams Weaver
Directions:
Cream butter, brown sugar, and granulated sugar in a stand mixer with paddle attachment for a couple of minutes. Slowly beat in the egg, vanilla, and molasses and mix until smooth.

Mix in the baking soda, salt, and cinnamon. Add in the flour and oats and mix on low speed until combined.
Oatmeal Cream Whoopie Pies ~ The Dreams Weaver
Scoop the dough using a 4 tsp cookie scoop to portion the dough onto a parchment or silicone mat lines baking sheet and space about 2" apart. Flatten the balls slightly and place in the fridge for about 20 minutes.
Oatmeal Cream Whoopie Pies ~ The Dreams Weaver
While the cookies chill, preheat the oven to 375°F and make the filling.
Cream the butter in a mixer with a paddle attachment until fluffy, about 5 minutes and then beat in the vanilla. Slowly add powdered sugar, about 1/2 cup at a time. Once all of the powdered sugar is combined, beat in the milk. Mix on high for a few minutes until fluffy and combined.
Oatmeal Cream Whoopie Pies ~ The Dreams Weaver
Add the filling to a ziploc bag {I place in a glass so it's easy to fill} and put in the fridge to firm up.
Oatmeal Cream Whoopie Pies ~ The Dreams Weaver
Bake the cookies 10-12 minutes, until lightly golden brown. Let the cookies cool on a rack for 30 minutes before filling.
Oatmeal Cream Whoopie Pies ~ The Dreams Weaver
Snip the corner of the filling bag and fill half the cookies {with the bottom facing up.} 
Oatmeal Cream Whoopie Pies ~ The Dreams Weaver
Place the second cookie on top for a sandwich!
Oatmeal Cream Whoopie Pies ~ The Dreams Weaver
Enjoy!

 photo signature_zpsf75b5071.png

Thursday, May 21, 2020

French Onion Challah

After last week's challah mashup, I was already thinking about next Shabbas and what new creation I can bake.

My husband had asked about making caramelized onions for a dinner, and it had me thinking about a new stuffed challah. We love French Onion Soup, and just got a bag of nutritional yeast from Trader Joe's by accident {added yeast to the list and he thought they were all the same.} 

While this version is made parve, I am thinking about Shavuot next week now. Swap out the nutritional yeast for parmesan cheese and added mozzarella cheese on top of the onions for an even more decadent French onion soup stuffed challah!
French Onion Challah ~ The Dreams Weaver
What you will need:
The Best Challah Bread recipe

Filling: {modified from my French Onion Soup recipe}
3 onions {I used 2 yellow and 1 red}
2 tbsp oil
2 tbsp sugar
1/2 envelope onion soup mix
1 tsp. salt
4 tbs. paprika
1 tsp garlic powder
optional: wine to deglaze
Nutritional yeast or parmesan
Mozzarella if making dairy


Topping:
1 beaten egg
Nutritional yeast or parmesan
Thyme

Directions:
Make dough according to directions here in my challah recipe.

While the challah rises, start making the filling for it.
In a large skillet, heat the oil on medium heat. While the oil is heating, slice up 3 onions and add the onions to the skillet. Let the onions sweat for 15-20 minutes, stirring occasionally. I add the sugar halfway through.

Once the onions have a nice brown sheen to them add the onion soup mix, salt, paprika, and garlic powder. Add the optional wine now to give the filling a deeper and richer flavor {or add umami seasoning.} Stir the mixture until it’s all incorporated and is a thick paste consistency.
French Onion Challah ~ The Dreams Weaver

Let the filling cool before starting the next step.

Preheat the oven to 375°F.

Divide dough into 4 equal parts and then roll each part into a  log, long enough to fit a loaf pan. 
French Onion Challah ~ The Dreams Weaver
Gently flatten each log so that it is about 2 inches wide. Spoon the cooled onion mixture along the center of each log and sprinkle nutritional yeast {or parmesan and mozzarella} along the top.
French Onion Challah ~ The Dreams Weaver
Pinch the edges to seal, and then braid the logs. Place the challah in a greased loaf pan and let the challah rise 30 minutes. Then brush with egg wash and sprinkle with nutritional yeast {or parmesan.} 
French Onion Challah ~ The Dreams Weaver

French Onion Challah ~ The Dreams Weaver
Bake for 30 minutes, until the top is golden brown and the challah is cooked through.
French Onion Challah ~ The Dreams Weaver

Enjoy!

 photo signature_zpsf75b5071.png

Wednesday, May 13, 2020

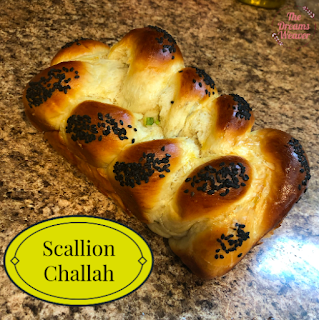
Scallion Challah

I have been on a challah mashup in the past few weeks. This week is an Asian spin, as I had a few too many scallions leftover that otherwise had the garbage can in their near future. The challah is reminiscent of scallion pancakes we would get for Chinese takeout.
Scallion Challah ~ The Dreams Weaver
What you will need:
The Best Challah Bread recipe

Filling
1 tablespoon toasted sesame oil
3 stalks scallions, minced
Salt, pepper, and crushed red pepper
1 egg beaten

Topping
A few pinches of toasted sesame seeds and black sesame seeds
Scallion Challah ~ The Dreams Weaver

Directions:
Make dough according to directions here in my challah recipe

Preheat the oven to 375°F
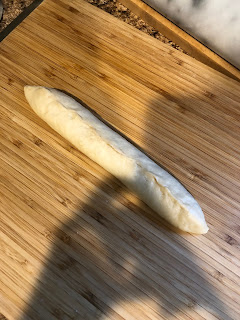
Divide dough into 4 equal parts and then roll each part into a  log, long enough to fit a loaf pan. 
Scallion Challah ~ The Dreams Weaver
Gently flatten each log so that it is about 2 inches wide. Brush each with toasted sesame oil and then sprinkle with salt, pepper, pepper flakes, and scallions. 
Scallion Challah ~ The Dreams Weaver
Pinch the edges to seal, and then braid the logs. Place the challah in a greased loaf pan and let the challah rise 30 minutes. Then brush with egg wash and sprinkle with sesame seeds. 
Scallion Challah ~ The Dreams Weaver
Bake for 30 minutes, until the top is golden brown and the challah is cooked through.
Scallion Challah ~ The Dreams Weaver
Try not to eat the challah before Shabbas!
Enjoy!
photo signature_zpsf75b5071.png

Monday, May 11, 2020

Chocolate Babkallah

This week I decided to try a mashup of challah and babka and am calling it my babkallah! It is so good for a little sweet treat before Friday night dinner!
Chocolate Babkallah ~ The Dreams Weaver
What you will need:
Challah recipe or Babka recipe {sweeter dough} for the challah part
Chocolate Powder, Chocolate Lava, and Babka Crumbs from my Babka recipe

Directions:
Prepare challah dough or babka dough per directions
Portion out challahs {either babka or challah recipe makes about 3 medium sized babkallahs}
For each babkallah, roll out 4 ropes and flatten each so there's room to stuff for filling.
Drizzle a line of the chocolate lava filling, followed by a dusting of the chocolate powder filling.
Chocolate Babkallah ~ The Dreams Weaver
Pinch up the sides to seal in the chocolate filling.
Chocolate Babkallah ~ The Dreams Weaver
Repeat this for all 4 ropes.
Chocolate Babkallah ~ The Dreams Weaver
Braid up the babkallah and place in a greased loaf pan, let rise for 30 minutes.
Chocolate Babkallah ~ The Dreams Weaver
Brush egg over the babkallah and top with the babka crumbs {or even just sprinkle cinnamon sugar over the egg wash if you don't want it too sweet}
Bake at 350°F for 30 minutes, then rotate the pan and bake an additional 15 minutes.

Enjoy!

 photo signature_zpsf75b5071.png

Monday, May 4, 2020

Homemade Flour Tortillas

This was my first attempt at homemade tortillas, and they are quite tasty! With Cinco de Mayo coming up, and COVID still looming over, we were not planning another grocery store run for another week or two! Seemed like the perfect time to try to make my own, and they come out so much cheaper and fresher than store bought.
Homemade Flour Tortillas ~ The Dreams Weaver

What you will need:
2 1/2 cups all-purpose flour
1 tsp kosher salt 
3 tbsp vegetable oil 
1 cup very hot water

Directions
Stir together the flour and salt in a bowl. Mix in the oil, then slowly pour in the hot water {not boiling!}, stirring constantly. When the dough comes together, turn it out onto a lightly floured surface. Knead it gently a few times to smooth out the dough. Let the dough rest in an oiled bowl covered with a towel for about an hour.
Homemade Flour Tortillas ~ The Dreams Weaver

Heat a cast-iron skillet or frying pan over medium-high flame. Section off a piece of dough slightly smaller than a ping-pong ball and roll it out into a 5-inch circle until its extremely thin.
Homemade Flour Tortillas ~ The Dreams Weaver

Cook the tortilla on the dry skillet for about 1 minute on the first side, until it starts to brown a little, then flip it and cook for about 30 seconds on the second side. Remove from the pan and stack onto a towel. As you stack the tortillas, wrap them in the towel while you cook the next ones to keep the warm and pliable.
Homemade Flour Tortillas ~ The Dreams Weaver

Serve with breaded fish, pulled meat, chicken, pico de gallo, guacamole...the possibilities are endless! Whatever combo you choose, don't forget a cerveza or margarita!
Homemade Flour Tortillas ~ The Dreams Weaver

Enjoy!

 photo signature_zpsf75b5071.png

Friday, May 1, 2020

Easy Asian Glazed Corned Beef

Traditional corned beef requires a pot of boiling water, 3 hours, and changing of the salty water. But, with an active toddler that wants my attention, I didn't want to have to stand over the stove and watch that he didn't try and touch the flame.

This recipe only requires the oven and only one pan to wash (or disposable pan to just throw away!)
Easy Asian Glazed Corned Beef ~ The Dreams Weaver
What you will need:
1 (2.5-3 lb) pickled brisket
Glaze
3/4 cup bbq or teriyaki sauce
2 tbsp soy sauce
1 tbsp rice vinegar
2 tbsp honey
1/4 cup brown sugar
1/2 inch fresh ginger, minced or 1 tsp ground ginger
4 cloves minced garlic

Directions:
Preheat oven to 350°F.
Place meat in its sealed bag of pickling liquid into a 9x13-inch pan. 
Add water to the pan until the meat is covered. 
Cover pan tightly with foil; bake for 2.5 hours, until meat is tender. 
Drain water from the pan and set meat aside until cool enough to handle.
While meat is cooling, prepare glaze.
Glaze:
Add glaze ingredients to a bowl and whisk to combine.
Remove meat from bag and drain all liquid. 
Rinse meat under cold water to remove any remaining pickling spices and salt. 
Return to pan and pour half the glaze over meat. Bake uncovered for 15 minutes. 
Remove from oven and pour remaining glaze over meat. Bake for an additional 15 minutes.
To serve, slice meat and spoon glaze/sauce over it.

Enjoy!
Easy Asian Glazed Corned Beef ~ The Dreams Weaver

 photo signature_zpsf75b5071.png