Showing posts with label diy. Show all posts
Showing posts with label diy. Show all posts
Tuesday, August 18, 2015
DIY Mason Jar Sugar Container
I had intended on purchasing a sugar container that had a pour spout, but never remembered to look for one the millions of times we went to Home Goods or TJMaxx.
The other week, I had finally finished the container of salt and it was sitting on the counter next to one of the mason jars I had just washed out. That's when the idea popped in my head. I could just cut out the top of the salt container and insert into the mason jar instead of the metal top!
What you will need:
Mason jar with lid
Emptied salt container {mine was from Morton's Salt}
Scissors
Pencil
The first thing you need to do is to cut off the top of the salt container.
Then trace the old metal circle from the mason jar onto the salt container lid and cut it out. At this point you can add a paper/fabric overlay over the plain white cardboard to make it look more professional, but I just left it white for now.
Fill the mason jar with sugar and secure the new lid on top.
Friday, July 11, 2014
DIY Coffee Sugar Scrub
I’m a huge fan of coffee, especially my new found love of cold-brewed coffee. After cold brewing, I am left with a ton of coffee grounds after. I wanted to find a way to re-purpose my leftover coffee grounds. I was researching ways in which to use them and stumbled upon a great scrub idea from The Kitchen on the Food Network.
Coffee, and caffeine in general, do amazing things for the body. Coffee intake has been studied on its affects, and drinking coffee helps prevent certain types of cancer! It is also an antioxidant. The grounds, when used as a scrub, are excellent exfoliates. They diminish the appearance of cellulite and tighten and tone your skin. Plus, you get to smell like coffee after! I love the smell of coffee.
What you will need:
3 TBSP coffee grounds
1 TBSP sugar (any one will do, I used brown sugar)
2 TBSP olive oil (or coconut oil)
½ tsp vanilla extract (optional)
Mix up all of the ingredients in a jar or some sort of seal-able container.
It will last up to 2 months in a sealed container.
Enjoy!

Thursday, May 8, 2014
Sharpie Painted Ceramic Mug
I have seen this sharpie craze all over Pintrest. I must have pinned at least a dozen ideas that I wanted to try with my Sharpies, and now it's finally here! One more thing I can check off my gigantic Pintrest to-do list!
What you will need:
Ceramic item
Sharpie (I used black, but you can use any color or colors)
Print out of design to stencil
Clear packing tape
X-acto Knife
Ruler
First, I printed out my design on my inkjet printer. You can totally freehand your design, but I wanted to do the NYC skyline and I wanted it to be exact!
Next, I covered my sheet of paper in strips clear packing tape. Once your entire sheet is covered in plastic, smooth out any air bubble. This will be the {sticky} stencil!
Submerge your plastic coated paper in water for ten minutes.
When it's ready to be taken out, it will curl up on itself. Lay out the sheet on a flat surface, like your counter, plastic side down.
Now it's time to remove all the paper. Rub your finger back and forth over the paper and it will start to lift off. Keep rubbing until all the white paper is gone and all you are left with is your design.
Now it's time to cut out that design! Cut away the entire colored area {that part is not sticky since it took to the color from the paper.} You can use this using plain old scissors, or I used an X-acto knife and ruler with the sticky side facing up.
What I realized the hard way only AFTER I finished, was that it would have probably been easier to cut away the design before submerging the sheet in water. That way you don't have to deal with a sticky stencil in order to cut out the design!
Now you are ready to stick that stencil to your mug. Trace the outline of the design {or fill in the entire area if you have the patience} with a fine Sharpie.
Place your mug in a cool oven, set the oven to 450. Once it gets up to temperature, leave the oven on for 20 minutes. After 20 minutes, turn off the oven. Leave the mug in the oven for 2-3 hours, or until completely cooled.
This process heats the glaze of the mug allowing the Sharpie ink to incorporate into it so that it will not wash off.
Please note that this mug will probably no longer be dishwasher safe if you want your design to last.
Now you are ready for some coffee drinking {or whatever else is your morning cup}!!
Sunday, March 30, 2014
Champagne Cork Picture Holder
The idea for a Champagne cork picture holder came about when I made my Monogram Jute Initial, it just took me this long to get around to posting about it!
I like the look of the jute letter with the cork holder, it gives it a country-ish feel.
What you will need:
Champagne cork (or any cork really)
Nail with a flat head
Hot glue gun
The first thing you want to do is to start making the hole into the cork {remember to make a hole in the side that will NOT be facing outward.} Make the hole by simply pushing the nail {pointy side} into the cork. You may need a little help from mr. hammer for this part.
Next, take the nail out of the cork. Then, push the nail back into the cork flat side first. Once the nail is 2/3 into the cork hot glue around the base of the cork to ensure that the nail won't come out.
Now just stick that baby into the wall and hang away!

Tuesday, January 28, 2014
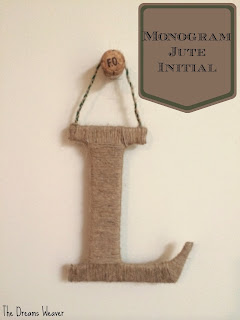
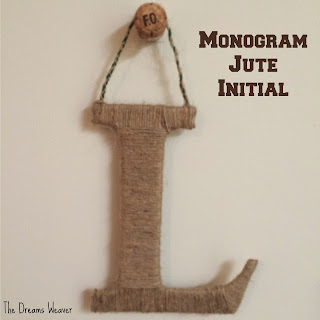
Monogram Jute Initial
I always love the letters I see in home goods stores to display on a mantle or bookshelf, but they always are so expensive! And, when they do go on sale, all of the good letters are sold out. Instead of waiting around for one, I decided to make my own. It's really cheap and easy too.
What you will need:
Cardboard
Jute (mine only cost $1 for 3 rolls at the dollar store)
Hot glue gun
The first thing you need to do is figure out the size and font type you want your letter to be. I used Word and made my letter fill the whole page and printed it. Then you want to cut out 2 cardboard letters from the letter you printed (or more if you want your letter thicker.)
Lay the 2 cardboard letters on top of each other. To make sure the jute was secure when I started wrapping it around the letter, I wedged the tail of it between the 2 cardboard letters.
Start wrapping the jute around the cardboard. Make sure that it is tight around the cardboard, otherwise it will unravel.
You want the jute to pretty much wrap in the same direction, otherwise it will look messy. Depending on your letters, you may need to cut small strands and glue them down like I have done in order for it to look neat and pretty. This is up to you, wrap that letter however your heart desires!
I wrapped the leg of the L perpendicular to the base to make my life easier! Then cut strands for the top portion like I did for the base.
Before I was completely done with the top part, I cut 3 strands of jute the length that I wanted it to hang. I braided them together, inserted them between the 2 cardboards like I did in the first step, and secured them in with a dab of glue.
Monday, January 20, 2014
Heart-Shaped Boxes
As I was making all these little 3D hearts, the Nirvana song “Heart-Shaped Box” just kept coming into my head! While they aren’t technically boxes since they do not open, I went along with the song stuck in my head for the title. The songs probably stuck in your head now too!
These little hearts look complicated to make, but they are really easy. They will be the base of many of my Valentine’s Day projects since they are just so cute.
What you will need:
Colorful cardstock or paper
Sciccors
Glue stick
Ruler
Sharp edge
Download the template to print your hearts on here
First, cut out the heart template along the solid black lines.
With your ruler and a sharp edge, score along all of the dotted lines. Apply only firm pressure when scoring, as you do not want to cut all the way through the paper.
Fold all scored lines inward (this way the marked up side will be on the inside of the heart and you won’t see any of the guidelines)
Glue one side of the heart to all of the little tabs.
If you’re at this part of humming the song in your head “I've been locked inside your heart-shaped box for weeks” you can even hide your own treasure inside the box {like a gift box} to be glued in for the receiver to open.
Glue the other side down, and you are essentially done.
You can make them into conversation hearts by just writing sayings across the front of the heart in colored markers.
Stay tuned for another Valentine’s Day idea made using these hearts!
Wednesday, December 25, 2013
Coffee Filter Flowers
I am sure that I am not the only one out there that loves having bright flowers in the house, especially on gloomy winter days! However, fresh flowers are always such a hassle, and never live long enough.
I have tried the fabric flowers, but they always look so fake and cheap looking no matter how hard you try! That is where my coffee filter flowers come in. To me, they look like a carnation, or a bunch of hydrangeas, maybe? I had these coffee filters in the house and I only own a Keurig...
Learning how to make paper flowers is so much fun and the creative aspects are endless! They can even be dip dyed for different affects. These homemade flowers are easy and are perfect for budget decorations, easy homemade gift ideas, or to help brighten your home. I whipped up my bunch today while watching the Food Network, they really take zero thinking.
What you will need:
- Several coffee filters, each flower will take 6.
- Clear drinking straws
- Scissors
- Tape
- Stapler
Flaten the coffee filters so that they are easier to work with. (#1 below)
Take 3 coffee filters and fold them into quarters. (#2 and #3) Now cut scallops. (#4) You don't need to be precise, this is just adding some dimension! Do this with 3 more coffee filters; each flower will use 6 total.
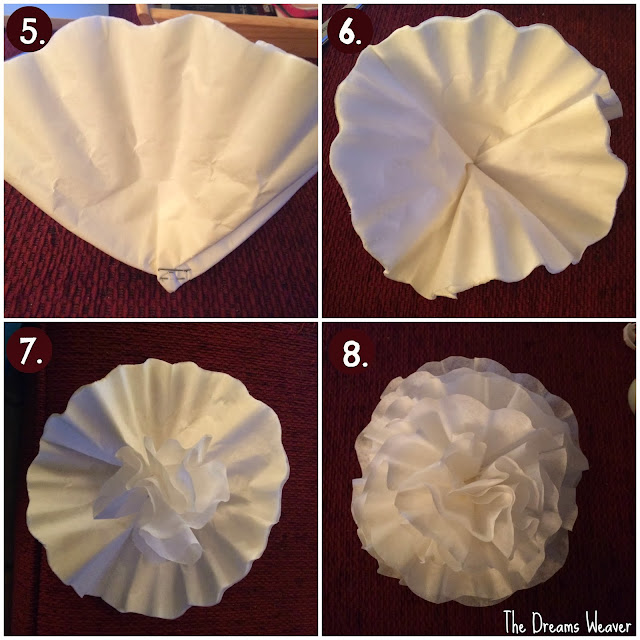
Stack all 6 of the coffee filters. Scrunch the bottom up as shown in the top left photo (#5) and staple it down.
Open up your flower as much as you can. It won't lay flat but you'll need to know where the center is. (#6)
Take the top layer and scrunch it up tight, squeezing the bottom of your flower. (#7)
Continue scrunching each layer, one at a time. (#8)
Lastly, staple a straw to the base of the flower and wrap some tape around it to stabilize it.
Do this for each one of your flowers, until you get the amount of flowers you would like for your bouquet to have.
I made a total of five flowers for mine. I also made two flowers with only 4 coffee filters to give my bouquet variation in sizes so they look more realistic.
Sit back and enjoy your new flowers!
Monday, December 9, 2013
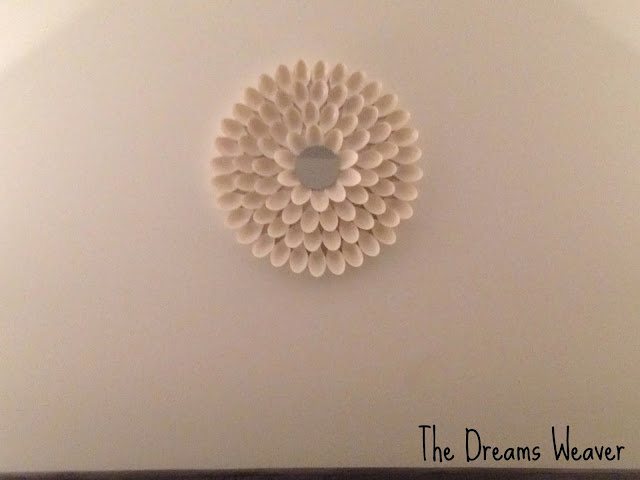
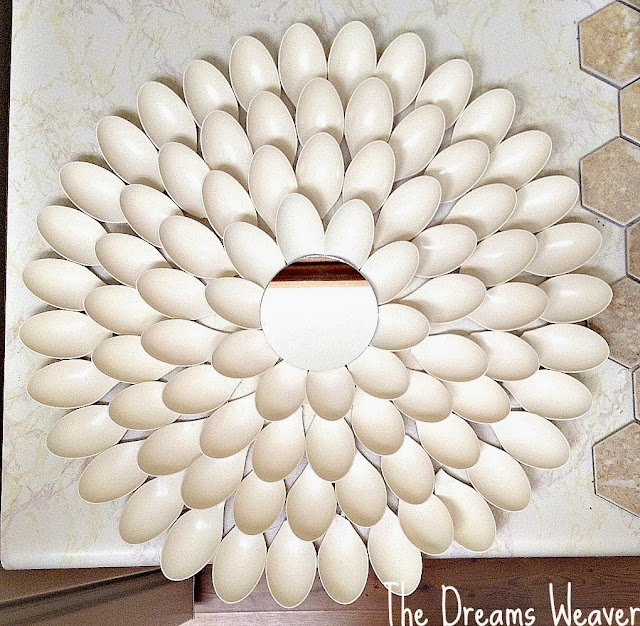
Upcycled Plastic Spoon Sunburst Mirror
Our room was in need of some DIYing and a more feminine touch {it’s mostly black and white, modern and clean, but it needed a little me added to it} So I headed over to my Pintrest page to my “For the Home” board of DIY projects I would love to complete, but just end up sitting there forever waiting, and waiting for me to get around to. I landed on this fun, cheap, and easy mirror made from the tops of plastic spoons.

What you will need:
- A LOT of plastic spoons
- Hot glue
- Round mirror {mine’s 3”}
- Cardboard
- Spray paint, any color you want the sunburst to be {I chose Satin White}
- Hook to hang it {I used a soda tab}

First, cut the base of the mirror out of a large cardboard box. I used my dog’s water bowl, as it looked like a good size for my mirror.

Next, you need to break the handles off of all your spoons. I actually needed to put on a pair of gloves, since it felt like I was going to get blisters from the spoon snapping back at me. That really helped!

I drew a circle 2” wider in diameter than my mirror in the center of my cardboard. This way I know where I should stop gluing my spoons.

Now comes the fun part, gluing all the spoons to the cardboard. Start from the outside of the circle and glue around and around, until you reach the center where you traced for your mirror to be placed. When you finish the outer circle and are starting the next layer, stagger the spoon petals so that they are layered between two spoons.

For the last layer of spoons, I actually glued the spoons to the back of the mirror.

I took my sunburst outside to be spray-painted. This step is totally not necessary, but I wanted my sunburst to look less like cheap shiny plastic, and give them a more matte {expensive} finished look. I used a satin finish, off-white spray paint from Krylon, and sprayed two coats of paint.

I sprayed the mirror with its one layer of spoons separately. I first covered the mirror with a sheet of paper the same size as it, and taped it in place to protect the mirror from the paint.

Once both pieces were completely dry, I glued the mirror center to the rest of the sunburst.
Last, I needed to find a small hook that I could glue to the back {since you can’t nail into cardboard!} I was stumped as to what I was going to use for this! Then, as I was drinking a can of seltzer, I decided to use the can’s tab! GENIUS! Voila, we have a hook! Just glue the soda can tab to the backside of the cardboard, leaving the top of the tab hanging off to hang from a nail.

I am so happy I finally completed one of my Pintrest projects that have been sitting there for forever! Next stop, back to the Pintrest board.


Subscribe to:
Posts (Atom)


