Tuesday, December 31, 2013

2014 Pantone Color of The Year


To kick off the New Year {a little early, but that's ok} I would like to share the 2014 Pantone color of the year.  Guess what color I will be wearing later? I absolutely love this color, it is so lively, bright, and cheerful! I cannot wait for 2014!
Stay tuned for more color/fashion trends for 2014 later this week.


PANTONE 18-3224 Radiant Orchid

"Expressive, exotic Radiant Orchid blooms with confidence and warmth"

The 2013 color of the year was Emerald. It served as a symbol of growth, renewal and prosperity.
2014 Pantone Color of The Year~ The Dreams Weaver2014 Pantone Color of The Year~ The Dreams Weaver
Source: Pantone

Radiant Orchid is a cross between fuchsia, and purple with pink undertones. 
It inspires confidence and emanates great joy, love and health. It is a captivating purple that will lighten up any day.
2014 Pantone Color of The Year~ The Dreams Weaver
Source: Pantone
Fashion:
It’s rosy undertones radiate on the skin, making a healthy glow when worn by both men and women. It is definitely an attention grabbing color. It was seen all over the runways for 2014, and even making its appearance on the runway.
2014 Pantone Color of The Year~ The Dreams Weaver
Source: Pantone
Beauty:
A very contemporary and versatile shade, it wakes up the skin, giving off a healthier complexion. It has both cool and warm undertones; and is flattering on most hair, eye and skin tones.
It is seductive when combined with red and pairs well with its sister shades of lavender, purple and pink, which provides an assortment of lipstick and blush options.

Interiors:
Brightens up interiors by incorporating this hue in wall paint, accessories, or accent pieces. Matches great with olive green, deep greens, or turquoise or pale yellow. Also livens greys or beiges.
2014 Pantone Color of The Year~ The Dreams Weaver
Source: Pantone
Have a happy and healthy new year!

Source: Pantone


 photo signature_zpsf75b5071.png

Monday, December 30, 2013

2014 Goals

I cannot believe it is almost 2014!  This year flew by so fast! Before the new year, I would like to share some of my goals for 2014.  I always say that I will have new year's resolutions and that I will stick to them, but halfway through January that always goes out the window.  For 2014, I thought actually writing them out will set it in stone for me, especially if it is on my blog!

So here it is:
 2014 Goals ~ The Dreams Weaver
On my last goal, I thought I would start early with blogivation by joining some weekly link parties to motivate me to keep up with my blogging and creative juices throughout the week!

Here are some blog parties that I joined this weekend:
Lil\'Luna   
  
The Chicken Chick

Thursday, December 26, 2013

2013 Year in Review


2013 has been a big year for me, right behind 2012. 
Even though I did not have a blog in 2012, I would like to share that year in review as well.
Here's to 2014!  Never sure exactly what is to come, but hoping it's the best yet!
2013 Year in Review~ The Dreams Weaver

2013 Year in Review~ The Dreams Weaver


 photo signature_zpsf75b5071.png

Wednesday, December 25, 2013

Coffee Filter Flowers


I am sure that I am not the only one out there that loves having bright flowers in the house, especially on gloomy winter days! However, fresh flowers are always such a hassle, and never live long enough. 
 
I have tried the fabric flowers, but they always look so fake and cheap looking no matter how hard you try! That is where my coffee filter flowers come in. To me, they look like a carnation, or a bunch of hydrangeas, maybe?  I had these coffee filters in the house and I only own a Keurig...
Coffee Filter Flowers~ The Dreams Weaver
Learning how to make paper flowers is so much fun and the creative aspects are endless! They can even be dip dyed for different affects. These homemade flowers are easy and are perfect for budget decorations, easy homemade gift ideas, or to help brighten your home. I whipped up my bunch today while watching the Food Network, they really take zero thinking. 
 
What you will need:
  • Several coffee filters, each flower will take 6.
  • Clear drinking straws
  • Scissors
  • Tape
  • Stapler 

Coffee Filter Flowers~ The Dreams Weaver
Flaten the coffee filters so that they are easier to work with. (#1 below) 
 
Take 3 coffee filters and fold them into quarters. (#2 and #3) Now cut scallops. (#4) You don't need to be precise, this is just adding some dimension! Do this with 3 more coffee filters; each flower will use 6 total. 
Coffee Filter Flowers~ The Dreams Weaver
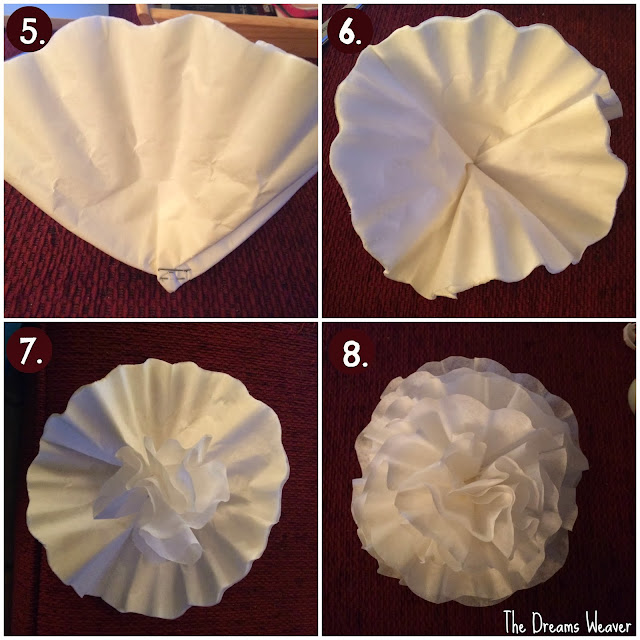
Stack all 6 of the coffee filters. Scrunch the bottom up as shown in the top left photo (#5) and staple it down. 
 
Open up your flower as much as you can. It won't lay flat but you'll need to know where the center is. (#6) 
 
Take the top layer and scrunch it up tight, squeezing the bottom of your flower. (#7) 
 
Continue scrunching each layer, one at a time. (#8) 
Coffee Filter Flowers~ The Dreams Weaver

Lastly, staple a straw to the base of the flower and wrap some tape around it to stabilize it. 
 
Do this for each one of your flowers, until you get the amount of flowers you would like for your bouquet to have. 
 
I made a total of five flowers for mine. I also made two flowers with only 4 coffee filters to give my bouquet variation in sizes so they look more realistic. 

Sit back and enjoy your new flowers! 
Coffee Filter Flowers~ The Dreams Weaver

 
 photo signature_zpsf75b5071.png

Tuesday, December 24, 2013

Dog Lovers Salmon Twizzle Sticks

Our dog, Jet, has a wheat allergy. Every time we need to pick up new treats for him, it is a long process. We need to read the labels for the ingredients to make sure that there is no flour, oats, or any other form of grain in there that could give him a tummy ache. Oh, and it is also important to look at where the treats are made. Remember the Waggin Train company treats that were causing kidney failure ? Those were from China, threw all those out. After that, we do not buy treats that are made in China, Japan, or anything like that.

These links have other important information on dog treats:
Treats that made dogs ill
Waggin Train Recall

We had bought Jet these dried fish skin sticks at an upscale gourmet dog store. He loved them, but our wallets did not. They were $2 a stick!

I have been thinking for ways to make him fresh and healthy treats, without spending a fortune. So, when I bought a 3 pound package of smoked salmon, I hit the jackpot. Hidden under the slices of salmon was the whole skin it was sliced off of, and I didn’t even know it!
Dog Lovers Salmon Twizzle Sticks~ The Dreams Weaver
This was the easiest treat to make for Jet, and he watched me the whole time salivating.  It’s like he’s a cat or something.

What you will need:
Salmon skin (or any other fish skin)
Dog Lovers Salmon Twizzle Sticks~ The Dreams Weaver

Dog Lovers Salmon Twizzle Sticks~ The Dreams Weaver
Preheat the oven to 275°F.

Line a baking sheet with parchment paper. (trust me you are going to want it lined, the fish oils come out of the fish and smell very fishy)

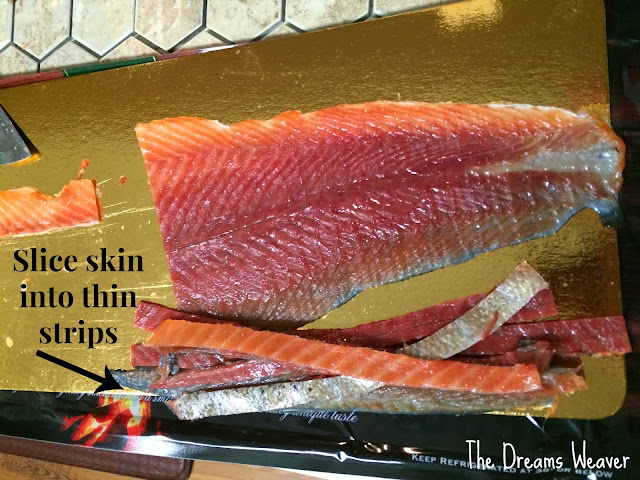
Slice the salmon skin in half, and then into thin strips.
Dog Lovers Salmon Twizzle Sticks~ The Dreams Weaver
Twist the strips, or make knots with the strips, or however else you would like them to look.
Bake in the oven for 1-2 hours, or until they are crispy and dry. Make sure to check on them midway.
Dog Lovers Salmon Twizzle Sticks~ The Dreams Weaver
Remove from the oven. Once cooled, lay on paper towels to remove the excess oils. I let them sit out overnight to dry even more.
Dog Lovers Salmon Twizzle Sticks~ The Dreams Weaver
Tell your dog to sit, roll over, or any other command as you got his/her attention with this amazingly easy homemade treat for them.

Dog Lovers Salmon Twizzle Sticks~ The Dreams Weaver


Watch them enjoy!

 photo signature_zpsf75b5071.png

Monday, December 23, 2013

Ginger Snap Cookies

This was my first attempt at ginger snap cookies, and they were a success on my first try! Each individual cookie is rolled in sugar, which gives it a great coat of sugar armor that protects the soft and slightly spicy ginger interior.
Ginger Snap Cookies~ The Dreams Weaver
This recipe makes 3 dozen cookies, or 2 dozen jumbo size cookies.

Prep Time: 15 minutes   Cook Time: 12 minutes   Total Time: 40 minutes

What you will need:
1 cup brown sugar
¾ cup canola oil
¼ cup maple syrup (or molasses)
1 egg
2 cups flour
2 tsps. baking soda
¼ tsp. salt
1 tsp. ground cinnamon
1 tbs. fresh ground ginger
1/3 cup white sugar for decoration
Ginger Snap Cookies~ The Dreams Weaver
Preheat oven to 375°F.

In a large bowl, mix together the brown sugar, oil, molasses, and egg.
Combine the flour, baking soda, salt, cinnamon, and ginger; stir into the molasses mixture.
Ginger Snap Cookies~ The Dreams Weaver
Roll dough into 1 ¼ inch balls. Roll each ball in white sugar before placing 2 inches apart on parchment paper lined cookie sheets.
Ginger Snap Cookies~ The Dreams Weaver
Bake for 10 to 12 minutes in preheated oven, or until center is firm. Let cool on wire racks.
Ginger Snap Cookies~ The Dreams Weaver

Enjoy!
Ginger Snap Cookies~ The Dreams Weaver
 photo signature_zpsf75b5071.png

Thursday, December 19, 2013

Applesauce Raisin Biscotti


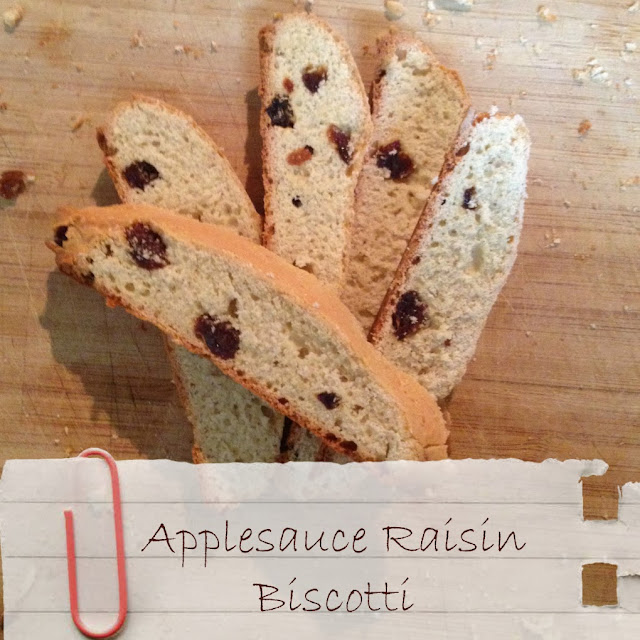
My third variation on my pumpkin biscotti this past weekend, applesauce raisin biscotti. Too many variations? NEVER! Each one has a completely different taste profile.
The applesauce in these keep the biscotti from getting too hard when they bake the last time after they are sliced.
Applesauce Raisin Biscotti~ The Dreams Weaver

What you will need:

2 1/2 cups of flour
1 cup of sugar
1 tsp. baking powder
1 tsp. cinnamon
Pinch of salt
1 tsp. vanilla extract
2 eggs
1/2 cup of cinnamon raisin applesauce
¼ cup raisins

Applesauce Raisin Biscotti~ The Dreams Weaver
Preheat oven to 350°F.

In a large bowl add flour, salt, sugar, baking powder, and cinammon.
In a medium bowl, whisk together eggs,, and vanilla extract.

Pour the wet mixture into the flour mixture. Give it a quick stir to incorporate all of the ingredients, the dough will be a little crumbly.

Give the raisins a quick chop and them into the batter.
Applesauce Raisin Biscotti~ The Dreams Weaver
Last, add your applesauce, mix again and that is all.
Applesauce Raisin Biscotti~ The Dreams Weaver
Line a baking sheet with parchment paper. Form the dough into a long log, roughly 16 inches long by 6 inches wide. The log should be relatively flat, only about ½ inch high, otherwise you will have really big sliced of biscotti.

Baked for 20-25 minutes at 350°F, until the center is firm to the touch.

Let biscotti cool for 15 minutes. Use a serrated knife cut the log into 1 inch wide pieces. Turn the oven to 300°F and bake for an additional 15-20 minutes. Allow to cool completely.
Applesauce Raisin Biscotti~ The Dreams Weaver

Enjoy!
 photo signature_zpsf75b5071.png